Make sure your connection is secure ("httpS:" instead of just "http:"). Click the logo above for a secure connection.
Make sure your connection is secure ("httpS:" instead of just "http:"). Click the logo above for a secure connection.
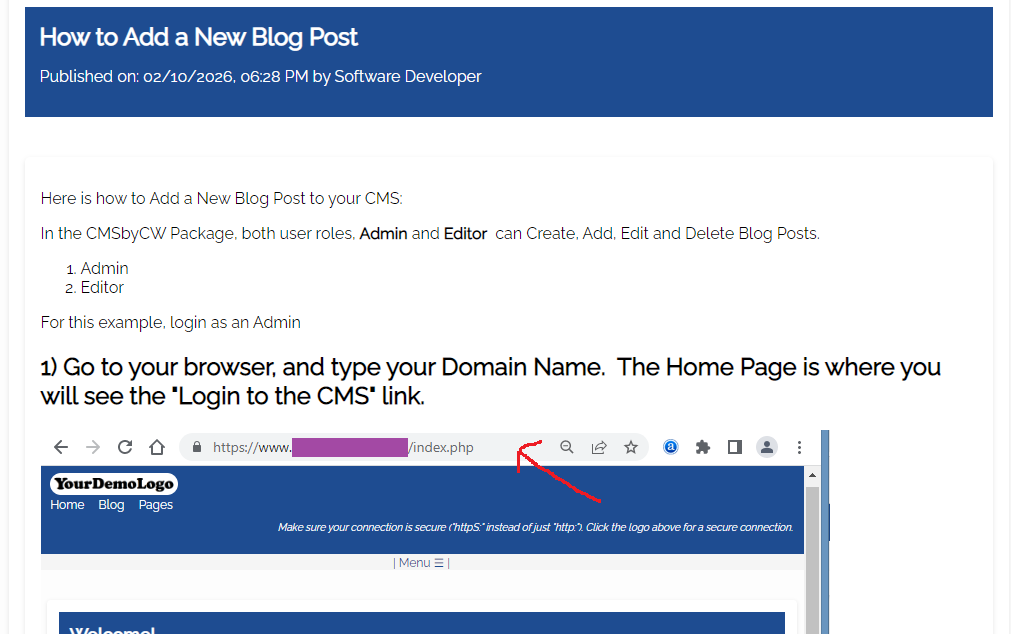
Published on: 02/11/2026, 05:48 PM by Software Developer
Let's Use a Sample Code from the previous blog post at:
How to Add an Image to a blog Post or web Page
The first screenshot's generic original code looks like this: (and the image protrudes, because of its original big size).
<p><img alt="" height="635" src="/assets/images/15-Example-How-To-Add-An-Image-Desktop-View.png" width="1363" /></p>
So I am adjusting it to the code below:
<p><img alt="" max-width="95% !important" min-width="370px !important" src="/assets/images/15-Example-How-To-Add-An-Image-Desktop-View.png" width="370px" /></p>
With this New Code, it should display like this:

<p><img alt="" max-width="95% !important" min-width="370px !important" src="/assets/images/15-Example-How-To-Add-An-Image-Desktop-View.png" width="370px" /></p>
<p><a href="/assets/images/15-Example-How-To-Add-An-Image-Desktop-View.png" target="_blank"><img alt="" max-width="95% !important" min-width="370px !important" src="/assets/images/15-Example-How-To-Add-An-Image-Desktop-View.png" width="370px" /></a></p>
So it can display small on small screens (without the image protruding, and triggerring the left to right scrolling), and will always have the option to view the image in its actual size.
Notice that the image above is clickable, and it will open a new tab that would display the full sized image. :-)
<p><a href="/assets/images/15-Example-How-To-Add-An-Image-Desktop-View.png" onclick="window.open(this.href, '', 'resizable=yes,status=no,location=no,toolbar=no,menubar=no,fullscreen=no,scrollbars=no,dependent=no'); return false;"><img alt="" max-width="95% !important" min-width="370px !important" src="/assets/images/15-Example-How-To-Add-An-Image-Desktop-View.png" width="370px" /></a></p>
It's another option, but some Browsers dsiable pop-ups, I thought I'd also include that code here, in case you want to try it.
How to Add an Image to a blog Post or web Page
Or go to the Help Page for other Documentation or Tutorials:
Thank you for visiting our website!